Debugging NodeJS Lambda functions locally using LocalStack
Unlock the power of local development & debugging for NodeJS Lambda functions with LocalStack & VS Code integration
Hi 👋
My name is Harsh and I'm an Engineer at LocalStack. I write about Open-Source projects, Cloud Toolings, DevOps, and automation!
AWS Lambda is a compute service that enables you to build and deploy serverless, event-driven applications. While developing these serverless functions, debugging is often seen as tedious and time-consuming, with the developers needing to upload and trigger their code every time they deploy. This development setup is often cumbersome, requiring you to redeploy and re-trigger your Lambda function until you get to the desired behavior.
LocalStack is a cloud emulator enabling you to build and deploy your Lambda functions locally. Unlike SAM CLI, LocalStack allows you to build and integrate your Lambda functions with other AWS services, like DynamoDB, API Gateway, and more! It allows you to debug your Lambda functions on your local machine without having to configure anything in your real AWS account and emulate a native behavior that significantly improves your Lambda development & testing experience.
In this blog, we will walk through how we can set up a remote debugging configuration with LocalStack & VS Code to debug your NodeJS Lambda functions. With LocalStack’s local Lambda debugging, you can quickly debug your NodeJS Lambdas by setting breakpoints, while local code mounting will allow you to validate your changes instantly.
Prerequisites
For this tutorial, you will need the following:
LocalStack to create a local Lambda function
awslocalcommand-line interface to run local AWS commands against LocalStackVS Code to run a debug configuration
Docker Compose to launch LocalStack with additional configuration
Setting up LocalStack
To get started with remote debugging your Lambda functions, we need to configure LocalStack before using it. For local code mounting our Lambda functions, we need to disable the flag that determines whether Lambda code is copied or mounted into containers.
We would also need to pass additional flags to Lambda Docker to set our Node options and the port to be exposed. We need to configure specific environmental variables available via LocalStack configuration options to do that.
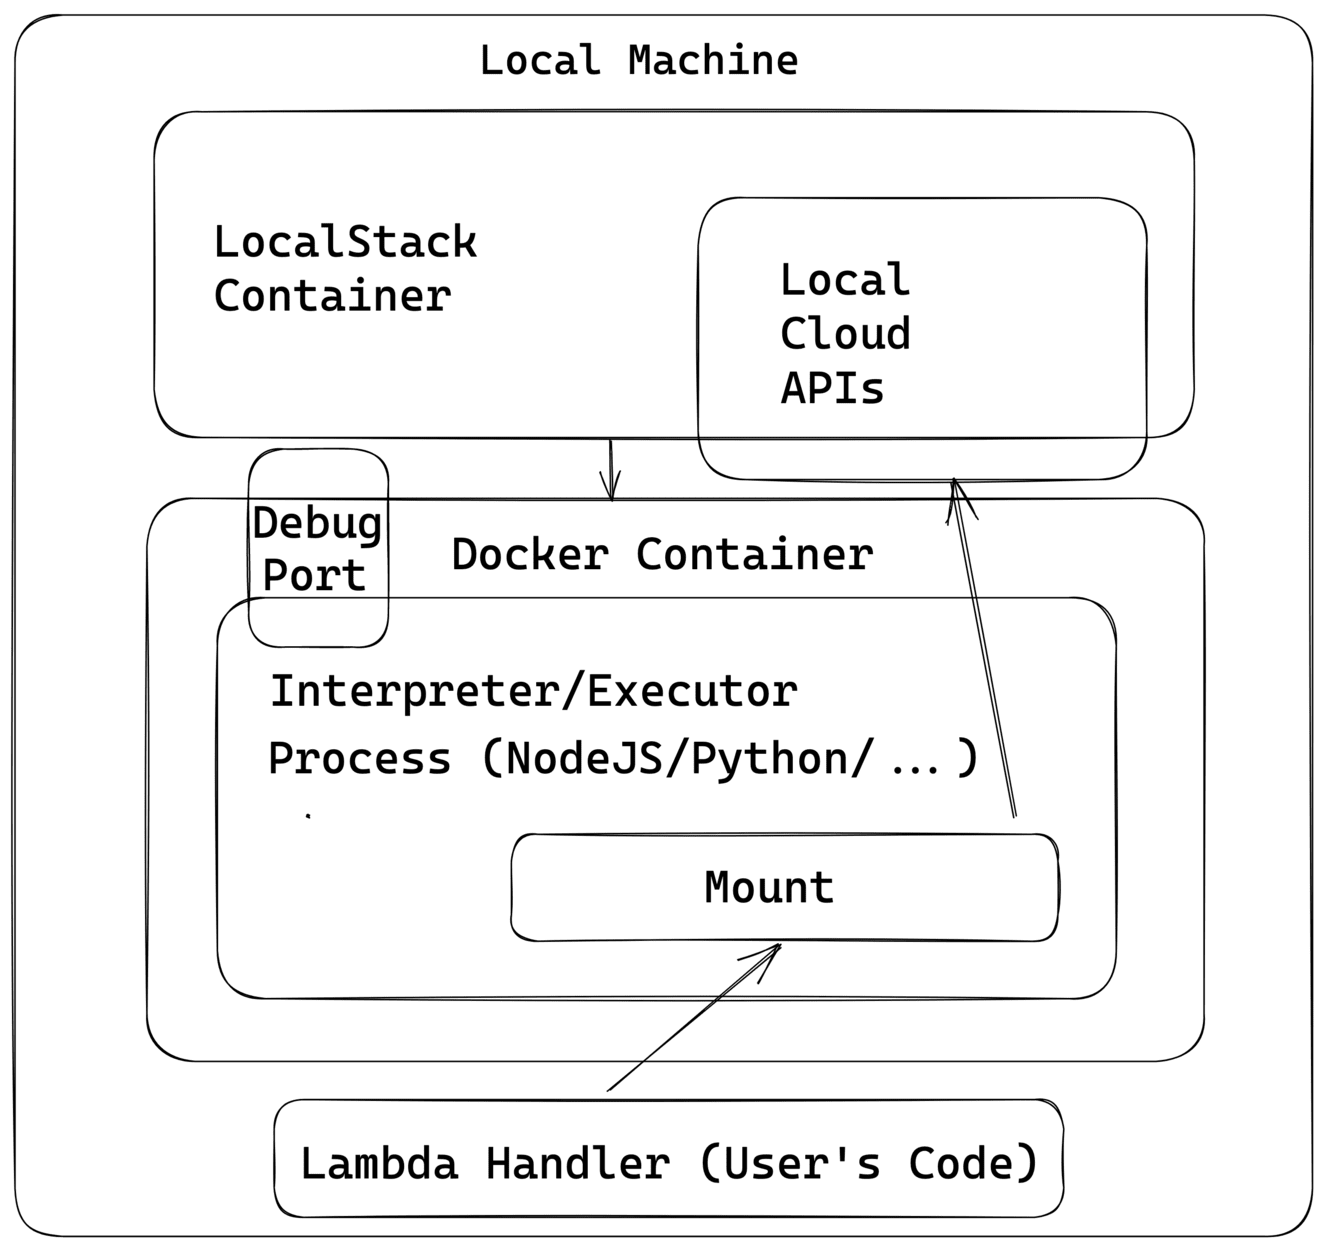
Here is an illustration that depicts how LocalStack makes it easy for you to mount your source code to a Lambda directly, and allows you to interact with local Cloud APIs while configuring a specialized debug port:
For this blog, we will start LocalStack with a Docker-Compose setup. Create a new file named docker-compose.yml and add the following configuration:
version: "3.8"

services:
  localstack:
    container_name: "${LOCALSTACK_DOCKER_NAME-localstack_main}"
    image: localstack/localstack:latest
    ports:
      - "127.0.0.1:4566:4566"            # LocalStack Gateway
      - "127.0.0.1:4510-4559:4510-4559"  # external services port range
    environment:
      - DEBUG=1
      - LAMBDA_REMOTE_DOCKER=0
      - LAMBDA_DOCKER_FLAGS=-e NODE_OPTIONS=--inspect-brk=0.0.0.0:9229 -p 9229:9229
      - LAMBDA_EXECUTOR=${LAMBDA_EXECUTOR-}
      - DOCKER_HOST=unix:///var/run/docker.sock
    volumes:
      - "${LOCALSTACK_VOLUME_DIR:-./volume}:/var/lib/localstack"
      - "/var/run/docker.sock:/var/run/docker.sock"
The LAMBDA_REMOTE_DOCKER configuration is set to 0 (deactivated) to ensure that the Lambda volume mounts work while we mount a temporary folder on the host. It allows you to mount your source code directly into a Lambda and run it, rather than zipping your code and deploying it repeatedly!
The LAMBDA_DOCKER_FLAGS configures the Node options and defines a Docker flag that exposes port 9229 for debugging the Lambda handler code that will run inside the container. Now with our Docker-Compose setup configured, let us start LocalStack:
$ docker compose up -d
Your LocalStack container will now be ready to build & test against! Optionally, if you don’t prefer using Docker-Compose, you can start LocalStack using the localstack CLI:
$ LAMBDA_DOCKER_FLAGS='-e NODE_OPTIONS=--inspect-brk=0.0.0.0:9229 -p 9229:9229' \
LAMBDA_REMOTE_DOCKER=0 \
localstack start -d
Setting up remote debugging
After setting up LocalStack and launching it in detached mode, we can now configure our remote debugging. To get started, create a new directory named .vscode on the root directory and create a new file named tasks.json inside it.
We will use Tasks inside VS Code to run scripts and start processes without providing any external configuration. Let us add a new task by adding the following code to our tasks.json file:
{
    "version": "2.0.0",
    "tasks": [
        {
          "label": "Wait Remote Debugger Server",
          "type": "shell",
          "command": "while [[ -z $(docker ps | grep :9229) ]]; do sleep 1; done; sleep 1;"
        }
    ]
}
Through this task, we will wait for the remote debugger server we have launched alongside LocalStack and wait for it on port 9229. Let us now go ahead and create a new file named launch.json inside the .vscode directory.
A launch.json file will support our debugging scenario, and we can define attributes to support our configuration. Let us add the following code in our launch.json file:
{
    "version": "0.2.0",
    "configurations": [
        {
            "address": "127.0.0.1",
            "localRoot": "${workspaceFolder}",
            "name": "Attach to Remote Node.js",
            "port": 9229,
            "remoteRoot": "/var/task/",
            "request": "attach",
            "type": "node",
            "preLaunchTask": "Wait Remote Debugger Server"
        },
    ]
}
The preLaunchTask, will check if the port is available to connect for debugging while remoteRoot is configured to point towards the directory where the Docker container will mount the Lambda. We are now ready with our remote debugging configuration! Let us create a new NodeJS Lambda function and set breakpoints while we inspect the execution flow.
Creating a NodeJS Lambda locally
We will create a simple NodeJS Lambda function to send a static response! Create a new file named function.js and add the following code:
exports.handler = async (event) => {
    console.log(event);
    const response = {
        statusCode: 200,
        body: "ok",
    };
    return response;
};
The Lambda function handles an incoming event and returns a simple response to the client. To start debugging, we first need to create the Lambda function on LocalStack. We will deploy the Lambda using a unique S3 bucket indicated by hot-reload as the bucket name.
The S3 key path should point to the directory of your Lambda function code. The handler is referenced by the filename of your Lambda function, where the code inside is invoked. Run the following command to create a Lambda function locally:
$ awslocal lambda create-function \
    --function-name localstack-nodejs-lambda-function \
    --code S3Bucket="hot-reload",S3Key="$(pwd)/" \
    --handler function.handler \
    --runtime nodejs14.x \
    --timeout 120 \
    --role arn:aws:iam::000000000000:role/lambda-role
We have referenced the function name as localstack-nodejs-lambda-function and set the timeout to 120 seconds. We are using a mock IAM role here, and you can further use LocalStack's IAM to enforce actual policies while working with local cloud APIs in LocalStack. The handler is configured function.handler, and we have configured the Lambda runtime.
After the Lambda function is created, you can list down all Lambda functions using the following command:
$ awslocal lambda list-functions
{
    "Functions": [
        {
            "FunctionName": "localstack-nodejs-lambda-function",
            "FunctionArn": "arn:aws:lambda:us-east-1:000000000000:function:localstack-nodejs-lambda-function",
            "Runtime": "nodejs14.x",
            "Role": "cool-stacklifter",
            "Handler": "function.handler",
         …
        }
}
Let us now set up breakpoints and check out our execution flow.
Debugging Lambda functions locally
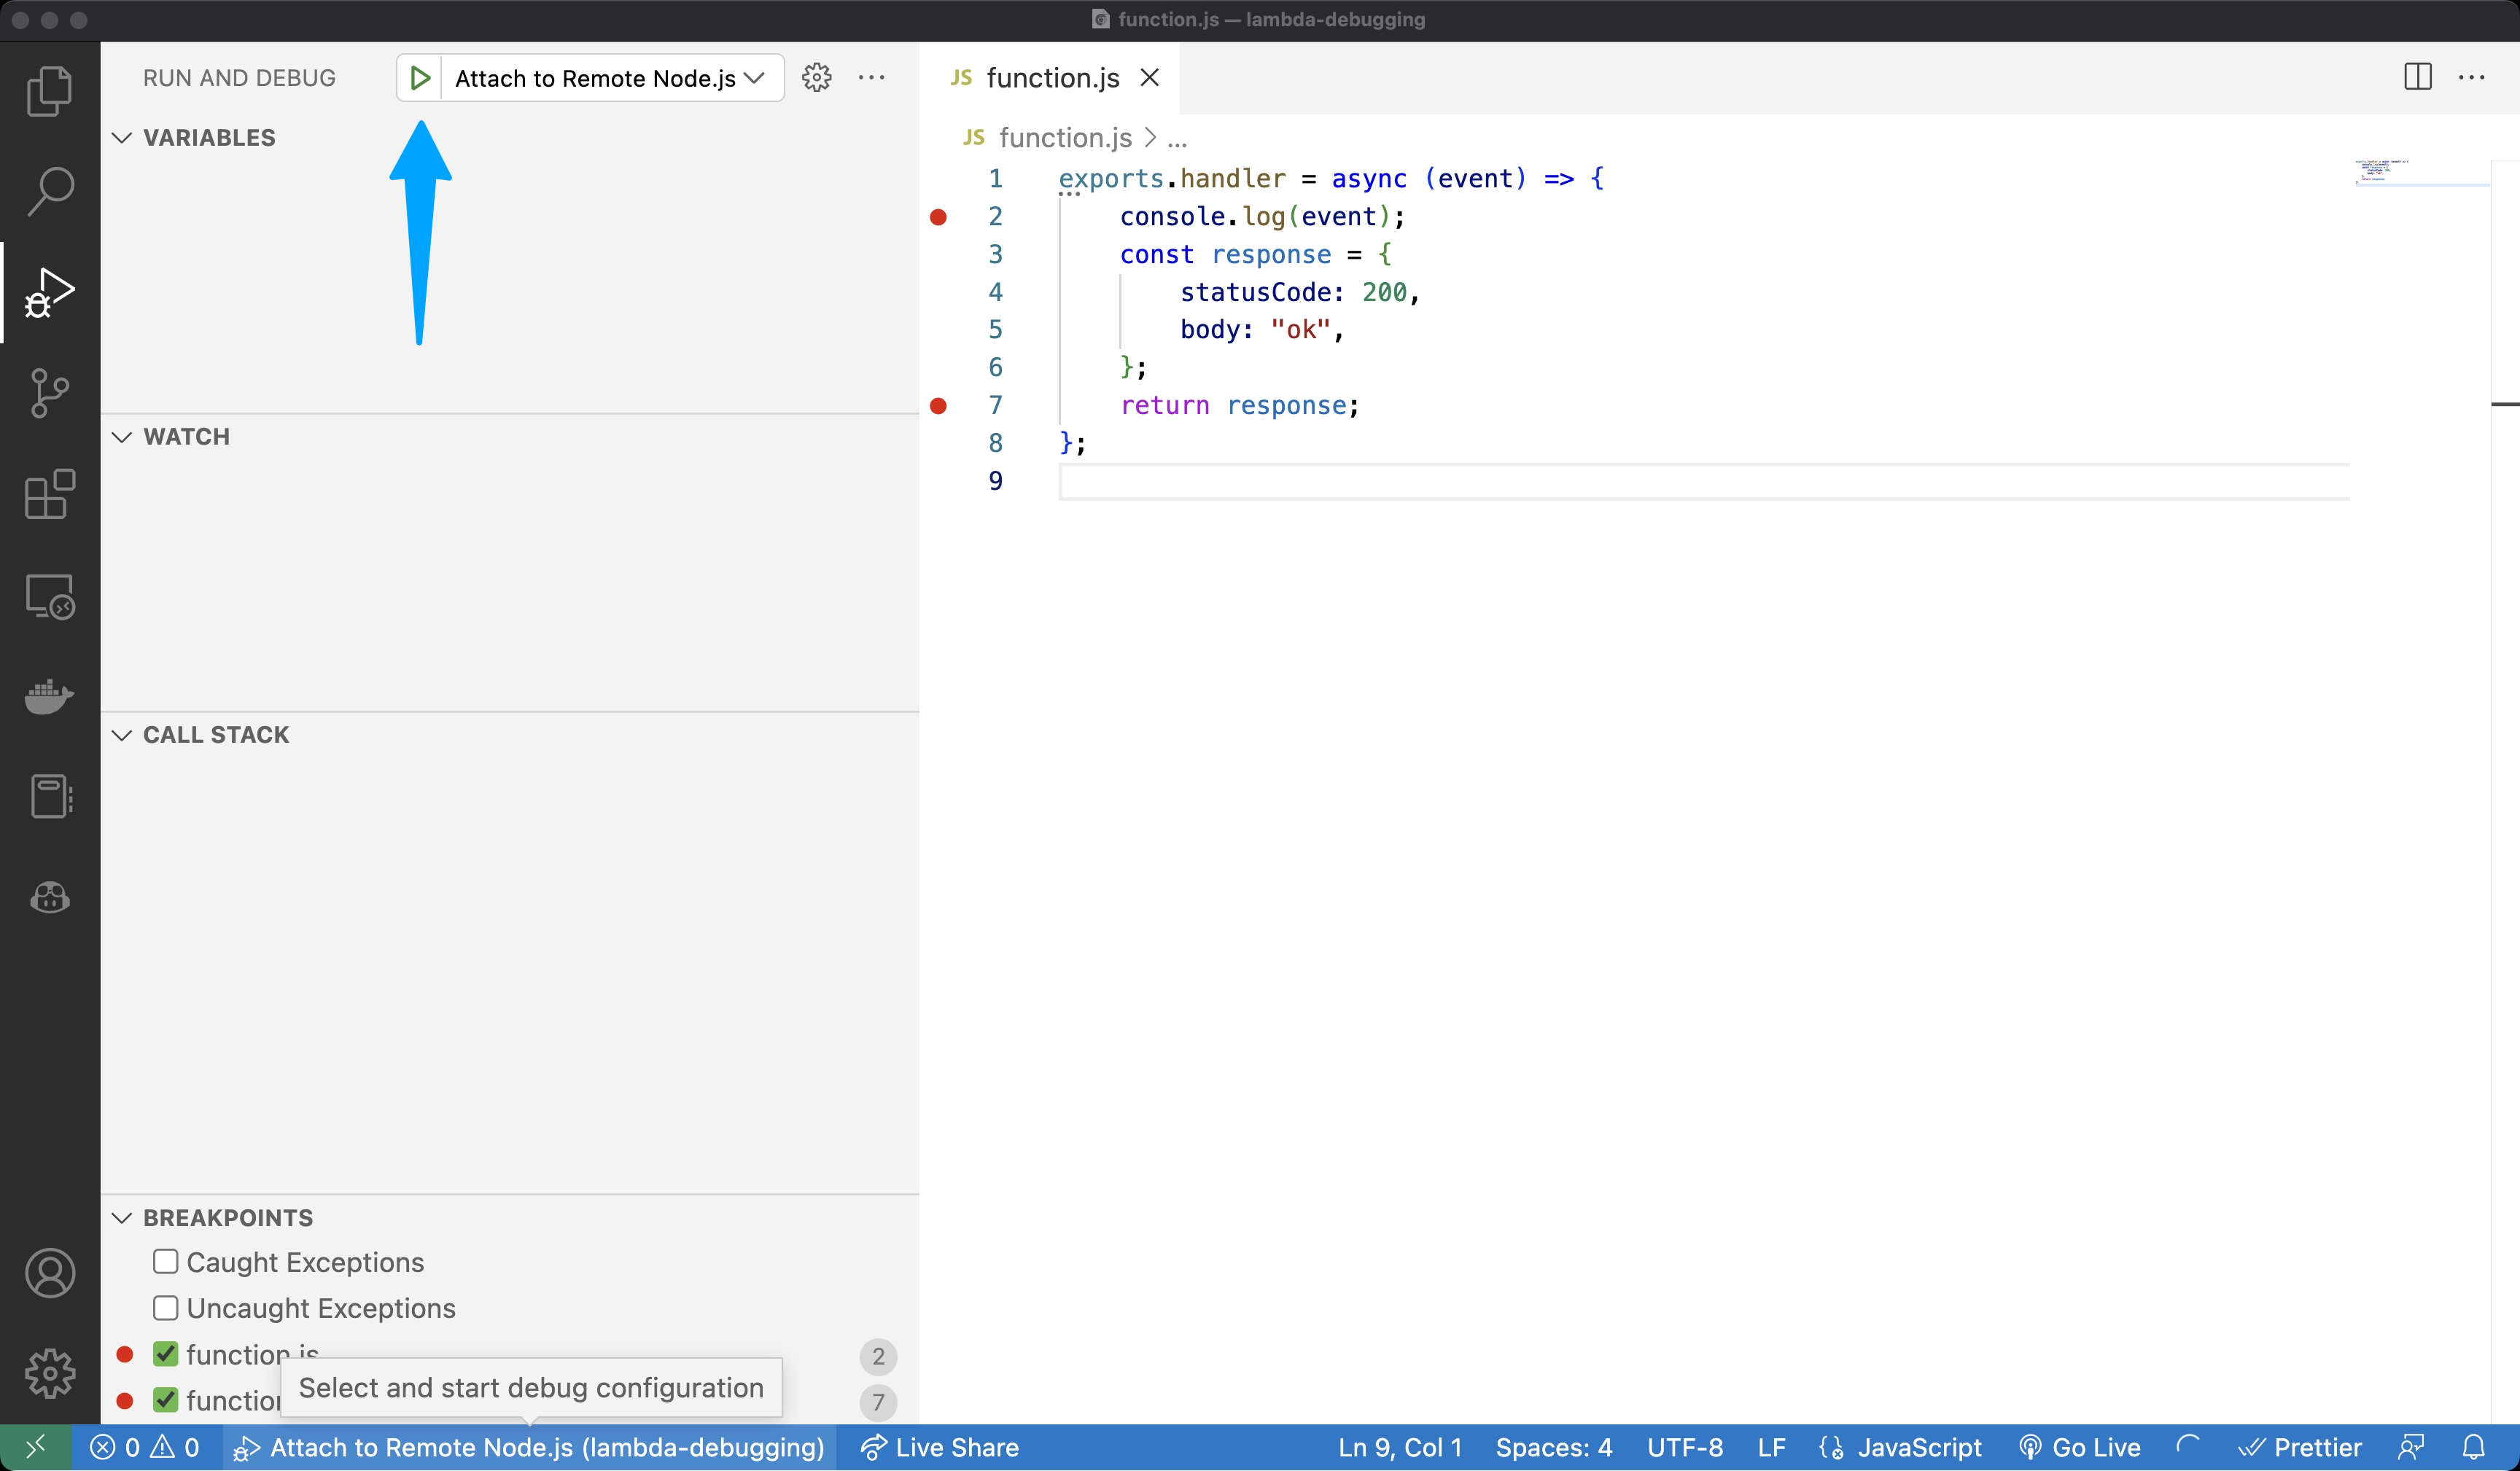
Bring up the Run and Debug view on VS Code by selecting the Run and Debug icon in the Activity Bar on the side of VS Code. We have already configured our running and debugging; hence you might be able to notice the Attach to Remote Node.js configuration in the Configuration dropdown in the Run and Debug view. Start debugging by clicking the Start Debugging button (or by clicking F5).
It will start a debugging session and execute the script defined as a VS Code task. Let us now set up breakpoints — Navigate to your function.js script, and set up breakpoints as you desire. After the breakpoints are configured, run your Lambda function using the following command:
$ awslocal lambda invoke \
    --function-name localstack-nodejs-lambda-function test.lambda.log \
    --cli-binary-format raw-in-base64-out \
    --payload '{"hello":"world"}'
You will automatically see our Lambda debugger in action:
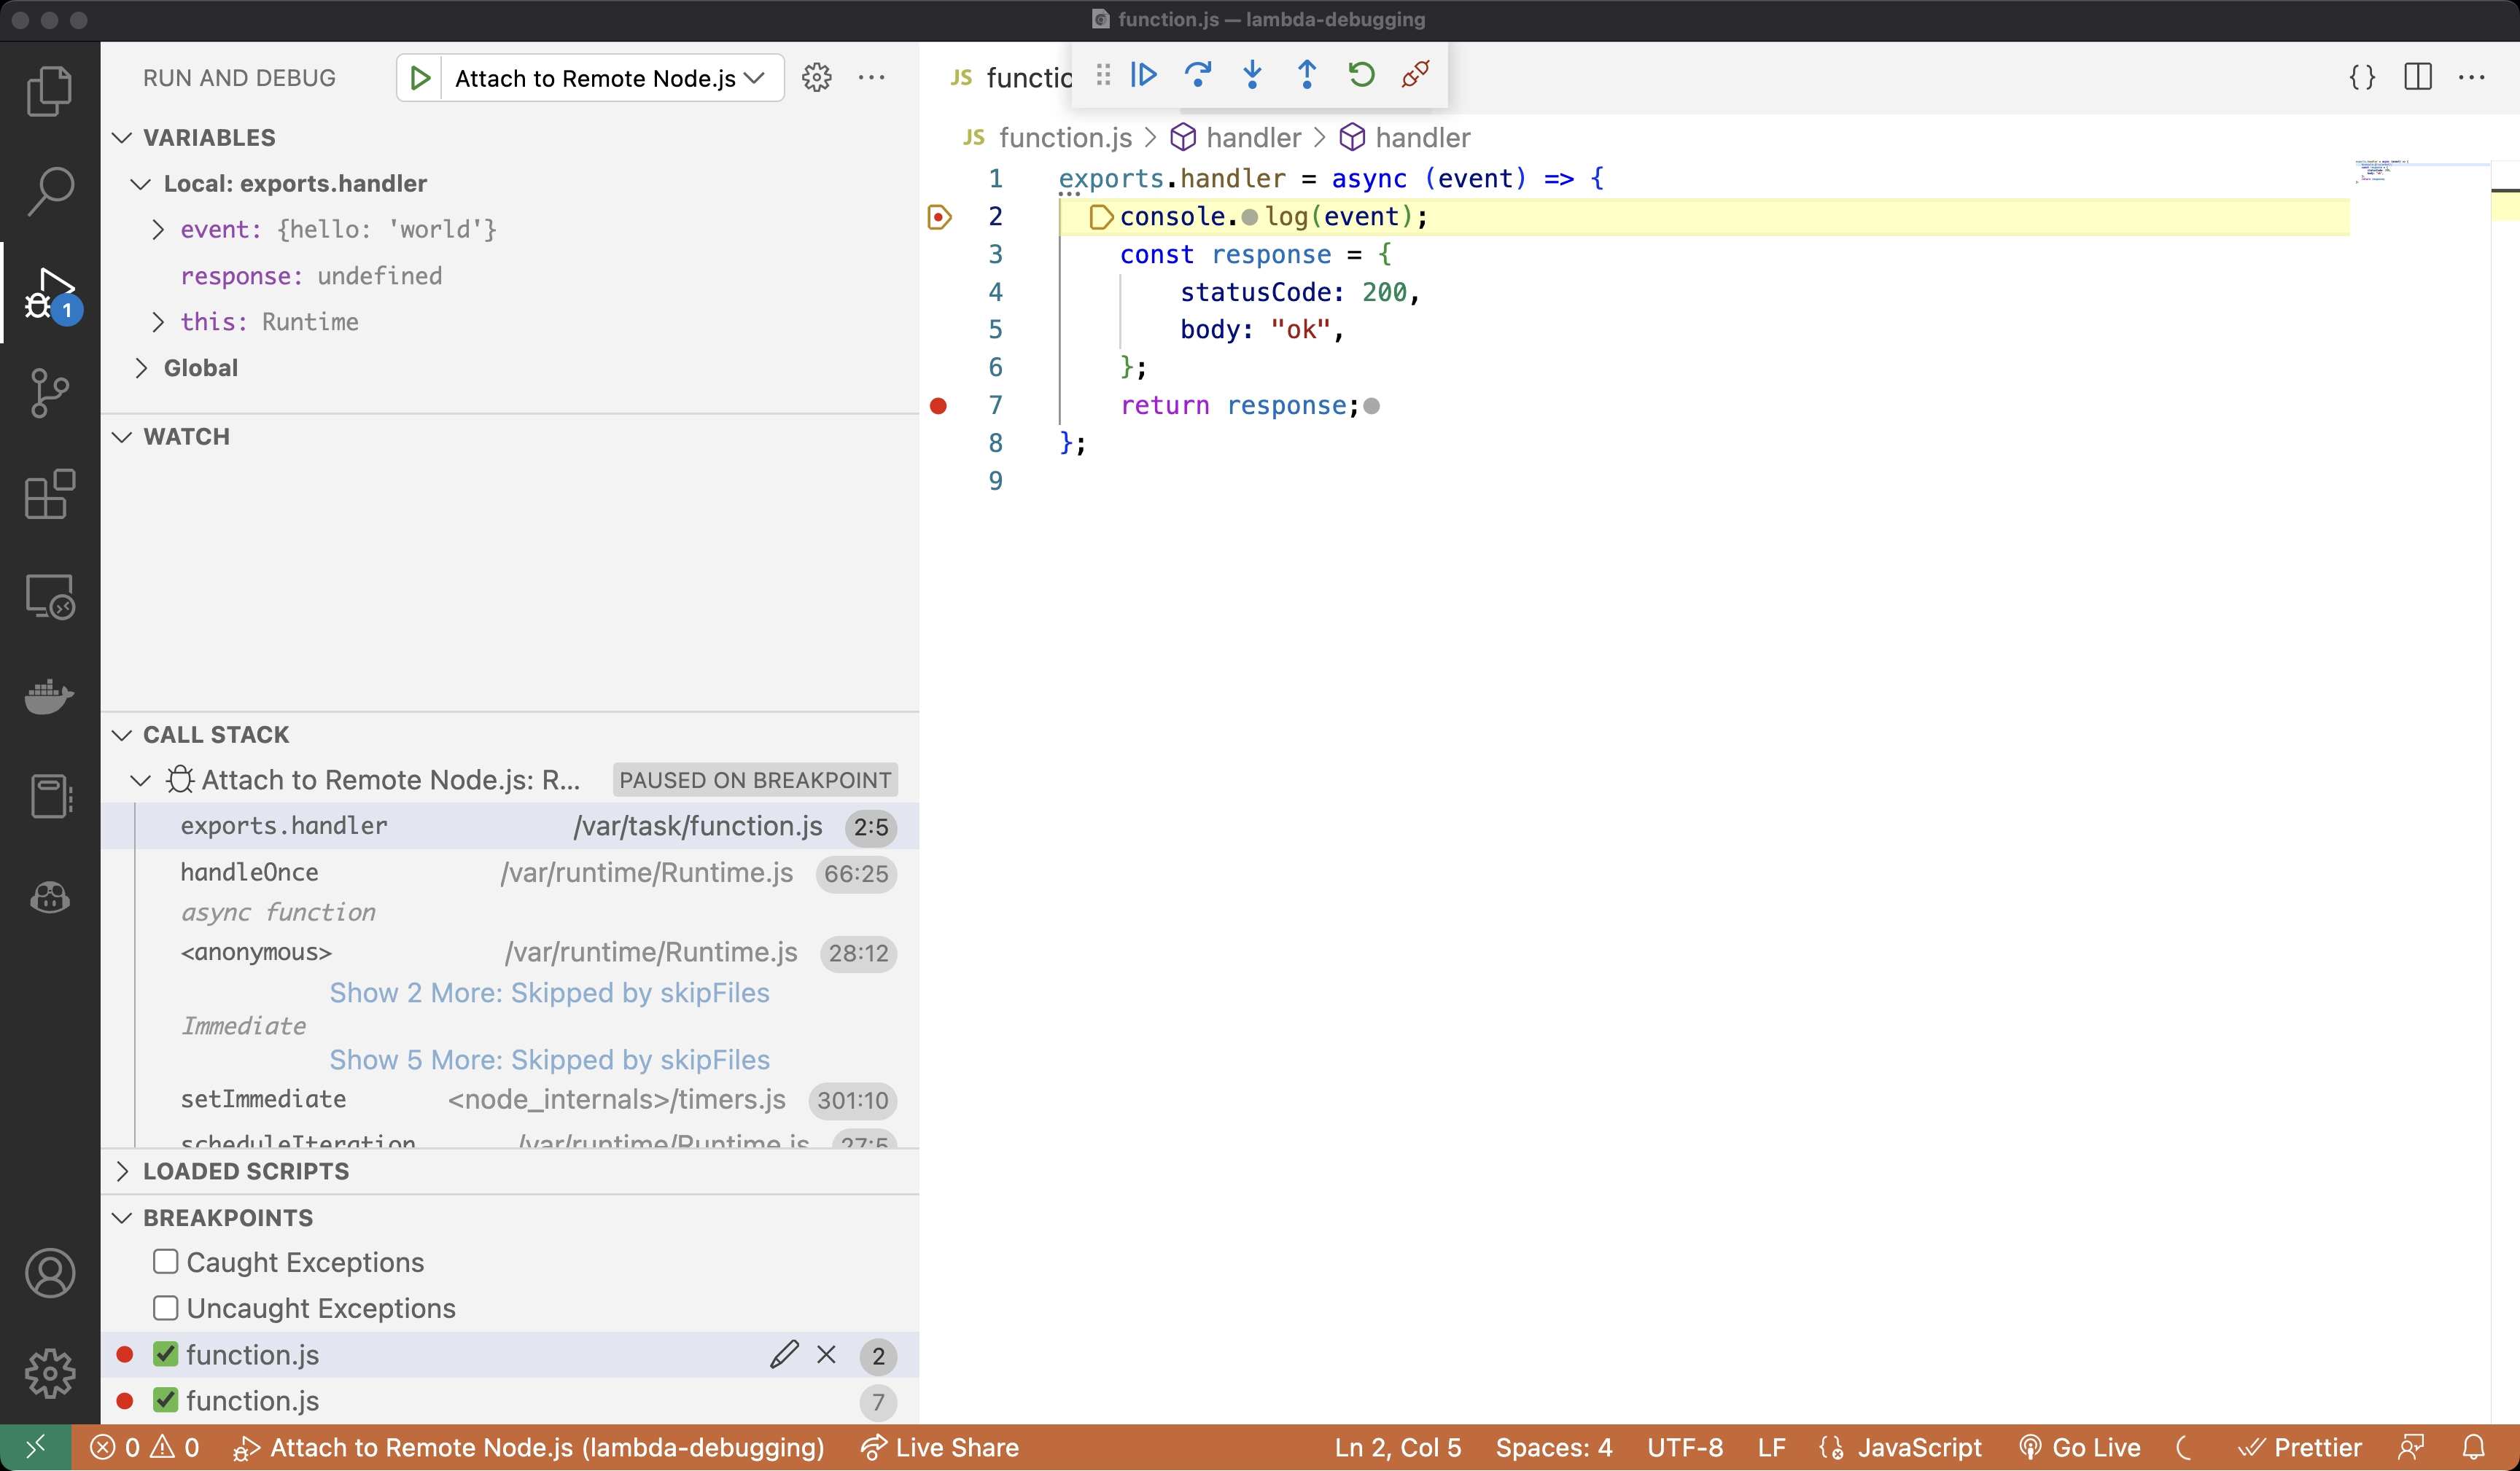
You can now see the Variables and Call Stack and continue to analyze your Lambda function. You can additionally continue making changes to your code and invoke the function without having to re-deploying your Lambda over and over again!
Conclusion
Debugging your Lambda function with LocalStack in your IDE is a great way to enable quick feedback cycles and to test and validate your code logic before pushing it to production. This allows for a rapid development & debug loop without the need to redeploy the Lambda after the handler is changed! However, due to the ports used by the debugger, you can currently only debug one Lambda at a time, due to which multiple concurrent invocations will not work.
Check out the above code on our repository and our remote debugging documentation to see how you can set up similar configurations for Python and Java!