Smooth transition from AWS to LocalStack for your DEV environment
Update
The application that this article relies on has gotten some improvements over the past few months. Please refer to the README file of the repository for up-to-date instructions. The principles described in this post are still valid. What has changed:
The Spring Boot application uses Java AWS SDK v2 to interact with the cloud services. Previously it was v1.
Two new services have been added: SNS & SQS.
The backend app uses SSE to refresh the frontend when it's done processing.
The Lambda function has been enhanced to add watermarks to the pictures.
The LocalStack version used in the docker-compose file is v2.
Terraform now randomly generates the names of the buckets and writes them to a configuration file that the app uses. This will prevent conflicts with global naming.
Lambda no longer needs a manually introduced flag variable for the development environment.
TL;DR
To gain the most out of this post, please follow along by cloning the project on GitHub.
We'll have a look at and set up a Spring Boot application that runs on both AWS and LocalStack.
Terraform will be used to create both real and emulated resources using the same HCL file.
We'll see the easy transition with minimal changes using S3, DynamoDB, and a Lambda function.
Letting LocalStack take the wheel on DEV
We all know AWS is wildly popular, and for good reasons, it has proven itself time and again to be an excellent choice for cloud development. AWS is great, don't get me wrong, but like all large entities, it will not bend down to you, a developer trying to test out your application as fast as possible. Resources can take time to create, they're tedious to clean up, and they can break the bank if not properly managed.
If you're not familiar with it, LocalStack is the complementary tool that can help alleviate those pains and let you focus solely on your tasks. And since I was also new to it, I had to see for myself, so I built a small prototype.
What started off as one focus point to see what it takes to switch to LocalStack, led me down a rabbit hole of discovering even more significant advantages, which we'll uncover as we go along.
What you'll need
Maven 3.8.5 & Java 17
AWS free tier account for setting up the AWS resources
Docker for running LocalStack
Terraform (+ Python pip for installing tflocal) for creating AWS and LocalStack resources
Diving into the sample application
Overview
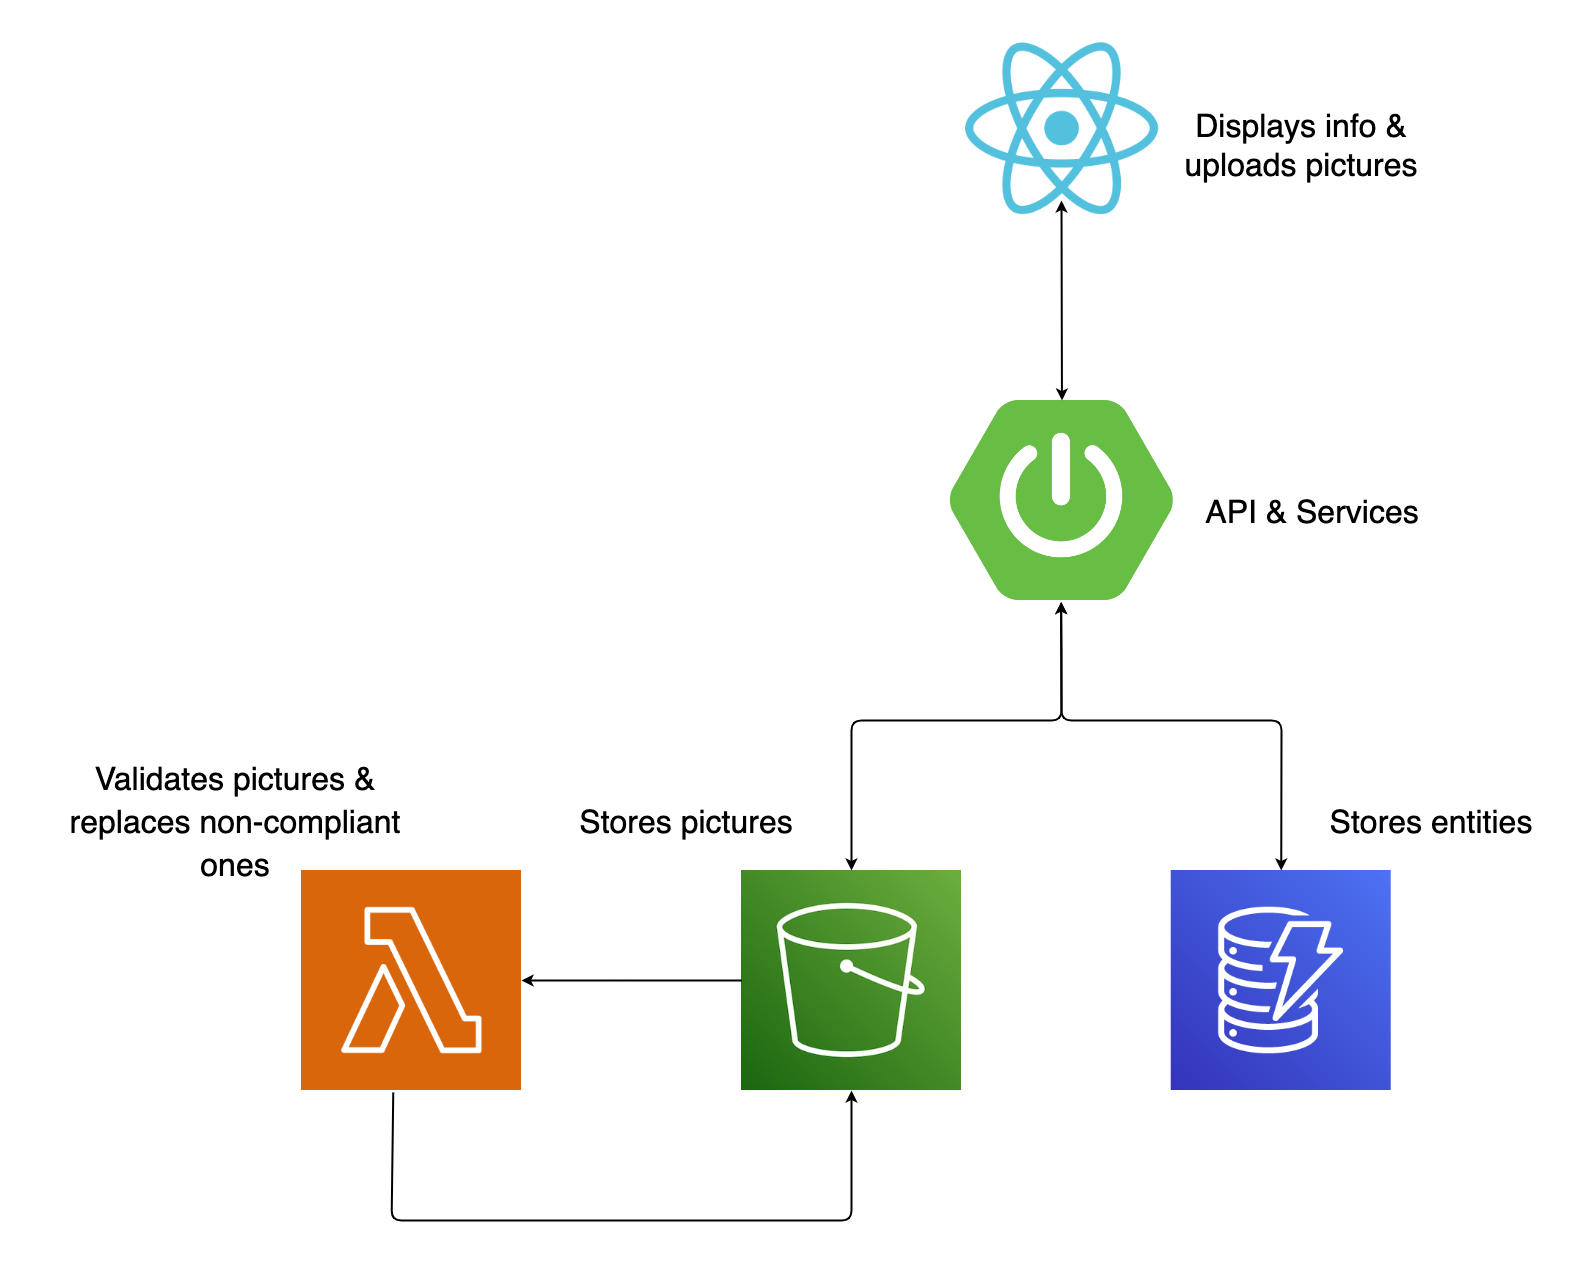
My previous job involved enterprise logistics applications, so it was only natural that I create a Spring Boot application dealing with shipments. You can view it as three layers working together: a React app on the front end side, a Spring Boot application for handling requests and serving data, and cloud services catering to different tasks.
This is what it looks like:
Inside view
The construction is a pretty basic Spring Boot structure: the primary entity in this system is a shipment, which includes participants (sender & receiver) and addresses. The calls from the front end are made to a controller class that acts as the intermediary, passing them on to a service class. This service class utilizes dedicated client classes for both S3 and DynamoDB to retrieve and store shipment data, ensuring that all the relevant information is accessible. Every S3 bucket insert will trigger a verification, handled by a Lambda function. The function will check if the file type is correct and make sure it's not an undercover executable. Any non-compliant file will be replaced with a standard image alerting you that your file is gone.
Outside view
Using the React app, you can see and delete shipments from your list and upload pictures so the receiver can get an idea of the shipment's size.
The interface design is pretty minimal:

The create and update actions are only available via direct REST API calls for now.
If it's not already clear, we're using the "banana for scale" measuring system. How else would you know, right??
Environments
Let's explore the project further.
We’ll take advantage of one of the core features of the Spring framework that allows us to bind our beans to different profiles, such as dev, test, and prod. Of course, these beans need to know how to behave in each environment, so they’ll get that information from their designated configuration files, application-prod.yml and application-dev.yml.
# application-prod
aws:
  credentials:
    access-key: ${AWS_ACCESS_KEY_ID}
    secret-key: ${AWS_SECRET_ACCESS_KEY}
  dynamodb:
    endpoint: https://dynamodb.eu-central-1.amazonaws.com
  s3:
    endpoint: https://s3.eu-central-1.amazonaws.com
  region: eu-central-1
# application-dev
aws:
  credentials:
    # can also be skipped with code validation
    access-key: test_access_key
    secret-key: test_secret_access_key
  s3:
    endpoint: https://s3.localhost.localstack.cloud:4566/
  dynamodb:
    endpoint: https://localhost.localstack.cloud:4566/
  region: eu-central-1
Since the project is ready to use in both environments out of the box, the general consensus is that anything labeled with prod will be using AWS resources and all that's labeled dev will rely on LocalStack resources.
Talk is cheap; show me the code
Configuration
Before getting started, make sure you create an AWS user via the management console with the following policies:
AmazonS3FullAccess
AWSLambda_FullAccess
AmazonDynamoDBFullAccess
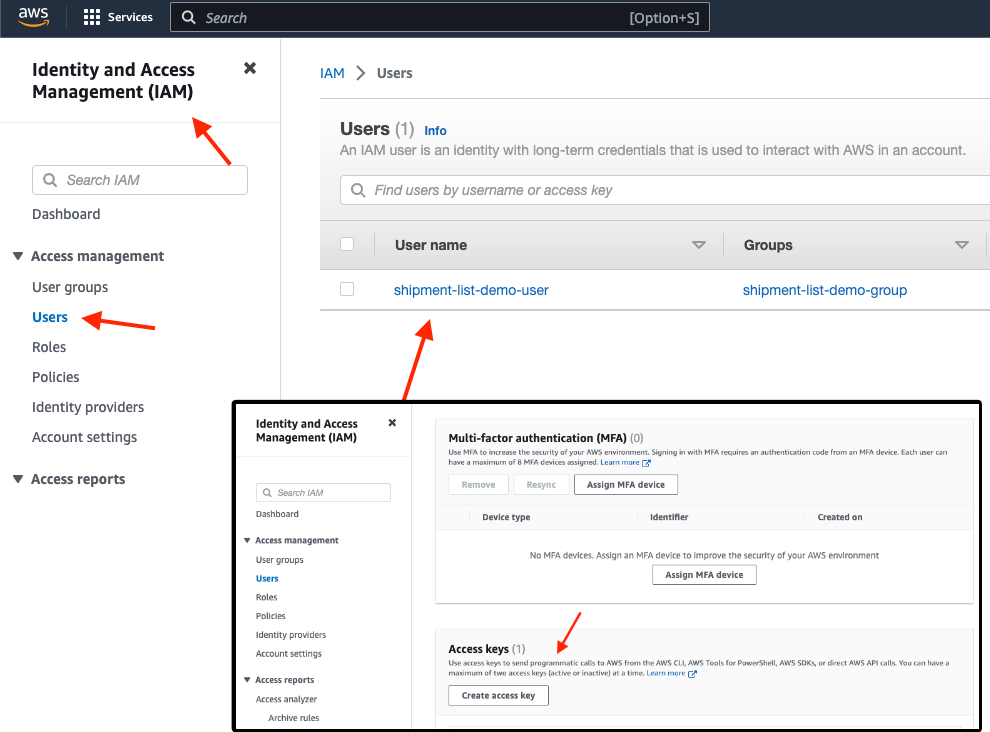
For ease of use, I decided to go for the full access policies, but of course, they can be more fine-grained, depending on your use case.
We will be using the user's credentials and export them as temporary environment variables with the export command:
$ export AWS_ACCESS_KEY_ID=[your_aws_access_key_id]
$ export AWS_SECRET_ACCESS_KEY=[your_aws_secret_access_key_id]
Our AWS integration stands in the Spring beans, for which we have an S3 configuration class and a DynamoDB configuration class:
@Configuration
public class AmazonS3Config {
  @Value("${aws.credentials.access-key}")
  private String awsAccessKey;
  @Value("${aws.credentials.secret-key}")
  private String awsSecretKey;
  @Value("${aws.region}")
  private String awsRegion;
  @Value("${aws.s3.endpoint}")
  private String awsS3EndPoint;

  @Bean
  public AmazonS3 s3() {
    AWSCredentials awsCredentials = new BasicAWSCredentials(
        awsAccessKey,
        awsSecretKey
    );
    AmazonS3ClientBuilder amazonS3ClientBuilder = AmazonS3ClientBuilder
        .standard()
        .withEndpointConfiguration(new EndpointConfiguration(awsS3EndPoint,
            awsRegion));

    return amazonS3ClientBuilder.withCredentials(new AWSStaticCredentialsProvider(awsCredentials))
        .build();
  }
}
The classes are pretty standard in setting up an Amazon S3 client. The @Configuration annotation indicates that this is a source of bean definition.
The credentials and region information are read from the property files using the @Value annotation and stored in private fields. You can also use configuration properties classes, it would look less cluttered, but let's keep it simple for now.
The s3() method, annotated with @Bean, is responsible for creating an instance of the Amazon S3 client. It uses the AWS SDK's AmazonS3ClientBuilder to create a client with the specified endpoint and region. The credentials are set and the builder is ready to return the S3 client that can be used throughout the application.
@Configuration
public class DynamoDBConfiguration {
  @Value("${aws.credentials.access-key}")
  private String awsAccessKey;
  @Value("${aws.credentials.secret-key}")
  private String awsSecretKey;
  @Value("${aws.dynamodb.endpoint}")
  private String awsDynamoDBEndPoint;
  @Value("${aws.region}")
  private String awsRegion;

  @Bean
  public DynamoDBMapper dynamoDBMapper() {
    return new DynamoDBMapper(buildAmazonDynamoDB());
  }
  @Bean
  public AWSCredentials amazonAWSCredentials() {
    return new BasicAWSCredentials(awsAccessKey, awsSecretKey);
  }
  @Bean
  AmazonDynamoDB buildAmazonDynamoDB() {
    return AmazonDynamoDBClientBuilder
        .standard()
        .withEndpointConfiguration(
            new EndpointConfiguration(
                awsDynamoDBEndPoint,
                awsRegion
            )
        )
        .withCredentials(amazonAWSCredentialsProvider())
        .build();
  }
  public AWSCredentialsProvider amazonAWSCredentialsProvider() {
    return new AWSStaticCredentialsProvider(amazonAWSCredentials());
  }
}
The exact same principle applies to the DynamoDB client, and we're done here.
The Lambda function is its own separate Maven project that I've squeezed in as a submodule to make everyone's life easier. We won't get into what exactly happens in the validation function now. The most important thing that you need to remember is the handler, which is an implementation of the RequestHandler<I,O> interface method, handleRequest, as part of the Java AWS SDK.
Before setting up the infrastructure, remember to build the shipment-picture-lambda-validator module, using mvn clean package shade:shade. The uber-jar that's being created will be stored in a designated S3 bucket.
Preparing the resources
Make sure you have Terraform installed and have a look at the HCL file that will create all the necessary resources:
# declares the provider it will be using (AWS) and the minimum
# version of the provider required to run the script
terraform {
  required_providers {
    aws = {
      source  = "hashicorp/aws"
      version = ">= 4.52.0"
    }
  }
}
provider "aws" {
  region = "eu-central-1"
}

# S3 bucket, named "shipment-picture-bucket", which is set to be destroyed even if it
# has non-empty contents
resource "aws_s3_bucket" "shipment_picture_bucket" {
  bucket        = "shipment-picture-bucket"
  force_destroy = true
  lifecycle {
    prevent_destroy = false
  }
}

# sets the bucket ACL to private
resource "aws_s3_bucket_acl" "shipment_picture_bucket_acl" {
  bucket = aws_s3_bucket.shipment_picture_bucket.id
  acl    = "private"
}

# dynamoDB table is created, with a primary key "shipmentId" and
# enables server-side encryption & tracking changes
resource "aws_dynamodb_table" "shipment" {
  name           = "shipment"
  read_capacity  = 10
  write_capacity = 5

  attribute {
    name = "shipmentId"
    type = "S"
  }
  hash_key = "shipmentId"
  server_side_encryption {
    enabled = true
  }

  stream_enabled   = true
  stream_view_type = "NEW_AND_OLD_IMAGES"
}

# populates table with sample data from file
resource "aws_dynamodb_table_item" "shipment" {
  for_each   = local.tf_data
  table_name = aws_dynamodb_table.shipment.name
  hash_key   = "shipmentId"
  item       = jsonencode(each.value)
}

# the bucket used for storing the lambda jar
resource "aws_s3_bucket" "lambda_code_bucket" {
  bucket        = "shipment-picture-lambda-validator-bucket"
  force_destroy = true
  lifecycle {
    prevent_destroy = false
  }
}

resource "aws_s3_bucket_acl" "lambda_code_bucket_acl" {
  bucket = aws_s3_bucket.lambda_code_bucket.id
  acl    = "private"
}

# bucket object with lambda code
resource "aws_s3_bucket_object" "lambda_code" {
  source = "../../shipment-picture-lambda-validator/target/shipment-picture-lambda-validator.jar"
  bucket = aws_s3_bucket.lambda_code_bucket.id
  key    = "shipment-picture-lambda-validator.jar"
}

# creates lambda using the JAR file uploaded to the S3 bucket.
# function has java 11 runtime, with a specified IAM role
# memory of 512mb, timeout of 15s, and environment variable
resource "aws_lambda_function" "shipment_picture_lambda_validator" {
  function_name = "shipment-picture-lambda-validator"
  handler       = "dev.ancaghenade.shipmentpicturelambdavalidator.ServiceHandler::handleRequest"
  runtime       = "java11"
  role          = aws_iam_role.lambda_exec.arn
  s3_bucket     = aws_s3_bucket.lambda_code_bucket.id
  s3_key        = aws_s3_bucket_object.lambda_code.key
  memory_size   = 512
  timeout       = 15
  environment {
    variables = {
      ENVIRONMENT = var.env
    }
  }
}

# notification for "shipment-picture-bucket" S3 bucket,
# so that the lambda function will be triggered when a new object is created in the bucket.
resource "aws_s3_bucket_notification" "demo_bucket_notification" {
  bucket = aws_s3_bucket.shipment_picture_bucket.id
  lambda_function {
    lambda_function_arn = aws_lambda_function.shipment_picture_lambda_validator.arn
    events              = ["s3:ObjectCreated:*"]
  }
}

resource "aws_lambda_permission" "s3_lambda_exec_permission" {
  statement_id  = "AllowExecutionFromS3Bucket"
  action        = "lambda:InvokeFunction"
  function_name = aws_lambda_function.shipment_picture_lambda_validator.function_name
  principal     = "s3.amazonaws.com"
  source_arn    = aws_s3_bucket.shipment_picture_bucket.arn
}

# IAM role with a policy that allows it to assume the role of a lambda function
# the role is attached to the Lambda function
resource "aws_iam_role" "lambda_exec" {
  name = "lambda_exec_role"

  assume_role_policy = <<EOF
{
  "Version": "2012-10-17",
  "Statement": [
    {
      "Effect": "Allow",
      "Principal": {
        "Service": "lambda.amazonaws.com"
      },
      "Action": "sts:AssumeRole"
    }
  ]
}
EOF
}

# used to attach the AmazonS3FullAccess policy to the IAM role lambda_exec
resource "aws_iam_role_policy_attachment" "lambda_exec_policy" {
  policy_arn = "arn:aws:iam::aws:policy/AmazonS3FullAccess"
  role       = aws_iam_role.lambda_exec.name
}

# used to create a custom IAM policy
# & give permission to the lambda to interract with the S3 and cloudwatch logs
resource "aws_iam_role_policy" "lambda_exec_policy" {
  name = "lambda_exec_policy"
  role = aws_iam_role.lambda_exec.id

  policy = <<EOF
{
    "Version": "2012-10-17",
    "Statement": [
        {
            "Effect": "Allow",
            "Action": [
              "logs:CreateLogGroup",
              "logs:CreateLogStream",
              "logs:PutLogEvents"
            ],
            "Resource": "arn:aws:logs:*:*:*"
          },
          {
            "Effect": "Allow",
            "Action": [
              "s3:GetObject",
              "s3:PutObject"
            ],
            "Resource": [
              "arn:aws:s3:::shipment-picture-bucket",
              "arn:aws:s3:::shipment-picture-bucket/*"
            ]
          }
          ]
          }
          EOF
}
Go to the setup/terraform folder where everything is already set, and run:
$ terraform init
$ terraform plan
Once these two commands run successfully, it's time to use:
$ terraform apply
You should be good to go using your AWS resources.
Running on AWS 📦
Just a few more steps: we need to start the React app, by going to src/main/shipment-list-frontend and running npm install and then npm start. Now it should be reachable on localhost:3000.
As I mentioned earlier, we'll be using the prod profile to connect our application to AWS resources:
$ mvn spring-boot:run -Dspring-boot.run.profiles=prod
And that's it. The application is ready to go. You can now see the sample shipments and edit their pictures using the GUI. You can also add and update more shipments by using the api/shipment endpoint.
Switching to LocalStack 🚀
This will be a breeze now that we have an understanding of what has been set in place in order to have all of this up and running.
You can run LocalStack directly using Docker:
$ docker run --rm -it -p 4566:4566 -p 4510-4559:4510-4559 localstack/localstack
Or by using docker compose up in the root folder.
To generate the exact same resources on LocalStack, we need tflocal, a thin wrapper script around the terraform command line client. tflocal takes care of automatically configuring the local service endpoints, which allows you to easily deploy your unmodified Terraform scripts against LocalStack.
You can install tflocal via pip (requires a local Python installation):
$ pip install terraform-local
Once installed, the tflocal command should be available with the same interface as the terraform command line. Try it out:
$ tflocal --help
Usage: terraform [global options] <subcommand> [args]
...
Switch to the setup/tflocal folder; the files are identical to the ones in setup/terraform, but for keeping track of the state, it is a good idea to separate these "workspaces":
$ tflocal init
$ tflocal plan -var 'env=dev'
$ tflocal apply -var 'env=dev'
What we're doing here is just passing an environmental variable to let the Lambda know this is the dev environment, so it adjusts the S3 endpoint. After that, the Spring Boot application needs to start using the dev profile (make sure you're in the root folder and stop the previous execution):
$ mvn spring-boot:run -Dspring-boot.run.profiles=dev
Go back to localhost:3000 and a fresh list will be available. Notice that the functionalities of the application have not changed.
We did it. We switched our existing application which was using AWS DynamoDB, S3, and Lambda, to emulations of those services on LocalStack.
Lessons learned
Ok, now we need to talk a bit about what just happened. Too fast? Let's rewind.
I see quite a few things to take away from this small project. Although I was set out to prove one thing, I ended up surprising myself with more convenient advantages:
There have been no changes to the code base. The entire transition from AWS to LocalStack happened based solely on profile configuration files by adjusting the endpoints as needed.
You can easily maintain your
prodandtestwhile simultaneously having a newdevconfiguration. It's a matter of a few YAML lines that can be passed to your Spring beans.The same Java AWS SDK is used for creating clients for Amazon services as well as LocalStack, so again, no code adjustments are needed.
There have been no changes to the IaC. We used the exact same HCL (HashiCorp Configuration Language) file to generate resources on both AWS and LocalStack, which means you can easily replicate whatever infrastructure you use in other environments.
Conclusion
There are many reasons why you should use LocalStack to help you develop your cloud applications. We've seen how easy it is to make the switch and on top of that you get:
Ease of collaboration - you can create the same resources on multiple machines.
Time saving - it's faster to create resources on LocalStack, and their interactions take half the time.
Cost saving - if you're not using the real cloud, then you're safe from scary surprises that might pop up in the billing section.
I hope I've convinced you to give it a try and if there are any questions you have regarding configuring and running your project, feel free to reach out and help me improve.
* When you're done, don't forget to delete your AWS resources by running terraform destroy in the setup/terraform folder.