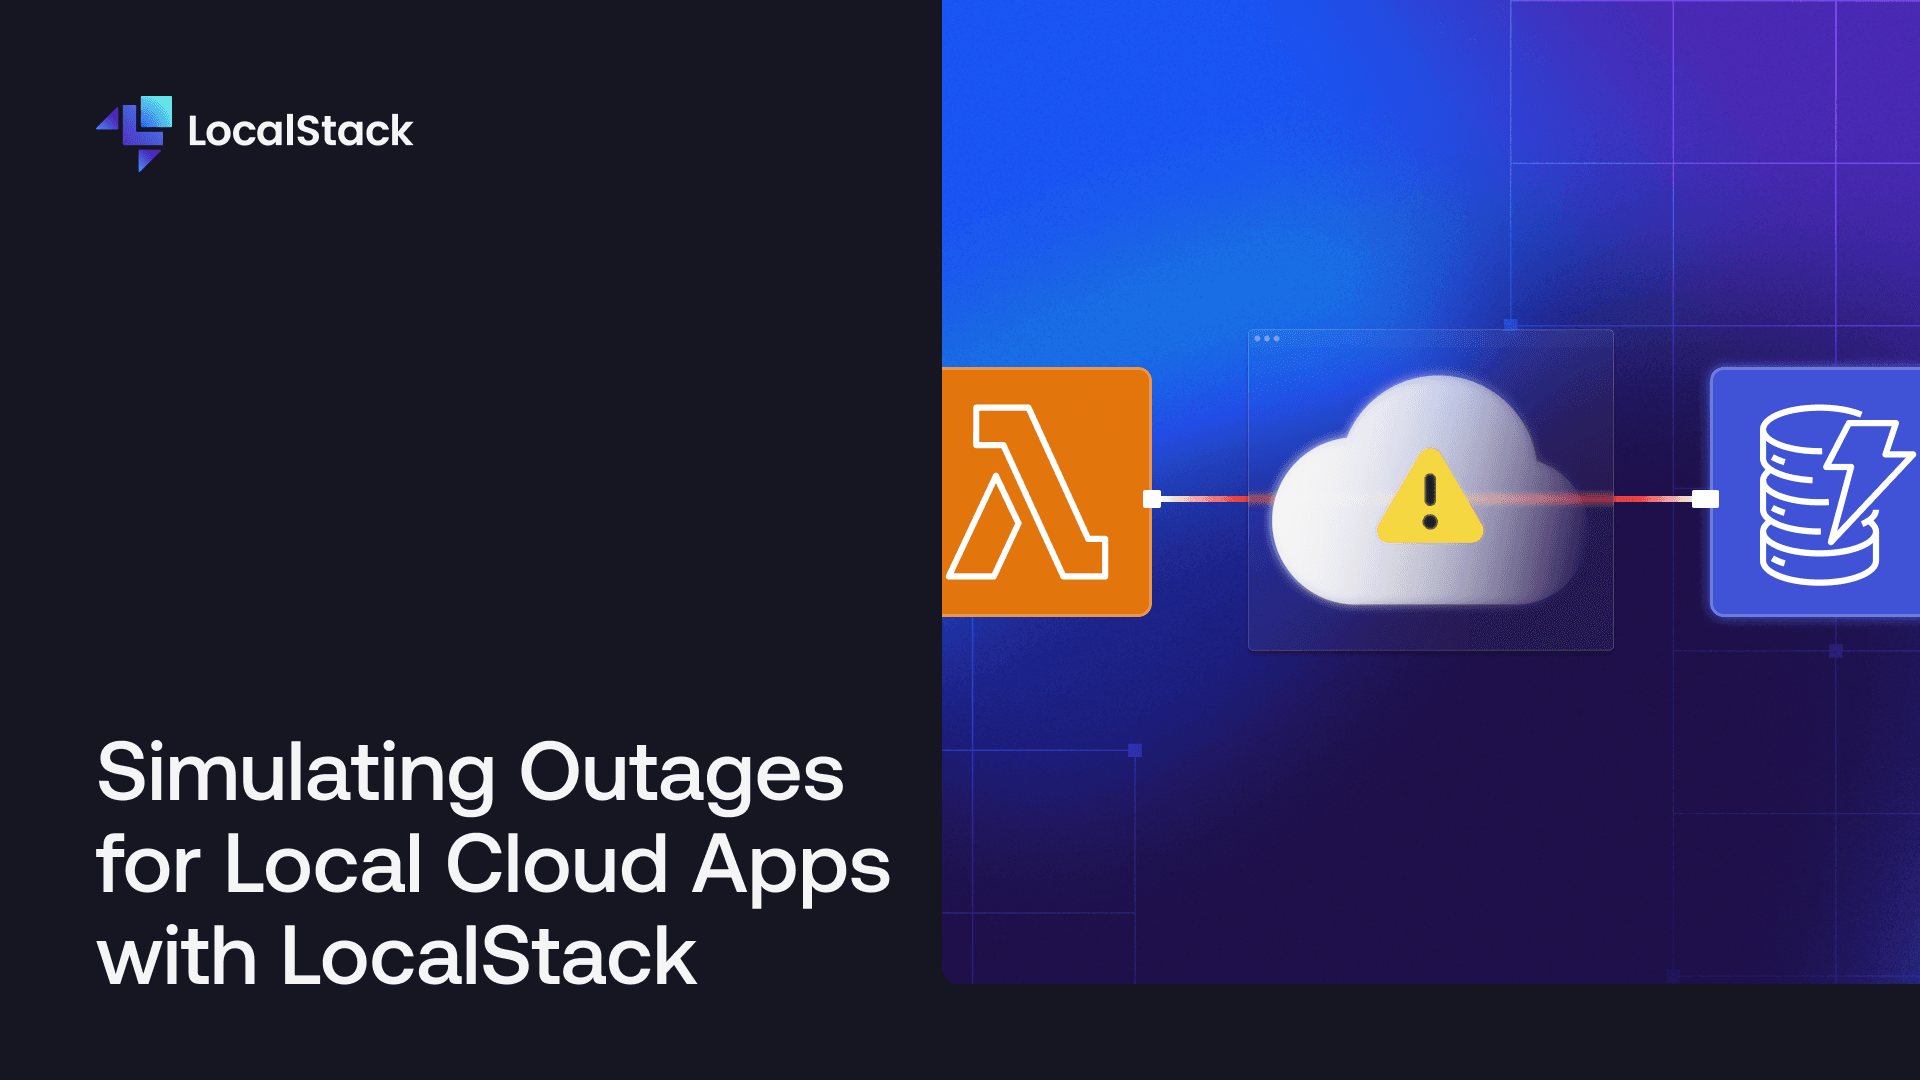
Simulating outages for local cloud apps with LocalStack
Learn how you can simulate a local outage for your cloud applications with LocalStack's Outages extension and test your architecture's resilience!
Hi 👋
My name is Harsh and I'm an Engineer at LocalStack. I write about Open-Source projects, Cloud Toolings, DevOps, and automation!
LocalStack's core cloud emulator provides the capability to emulate various AWS services, including Lambda, DynamoDB, ECS, and more, directly on your local machine. One notable feature of LocalStack is its support for advanced disaster recovery testing, including:
Region failover
DNS failover
Service failure simulations
All these testing scenarios can be efficiently executed within LocalStack, providing thorough coverage for critical situations in a matter of minutes rather than hours or days. To simulate service failures in LocalStack, you can use the Outages extension that enables you to start a local outage, right on your developer machine.
This allows you to quickly experiment with different failure scenarios, allowing you to perform chaos testing at an early stage by introducing errors at the infrastructure level. This is valuable as it enables you to replicate conditions that might not be feasible to mimic unless deployed to a production environment.
This blog will walk you through the process of setting up a cloud application on your local machine and leveraging the Outages extension to perform service failures in a local environment while using robust error handling to address and mitigate such issues. Furthermore, we will explore how to shift-left your chaos testing by integrating automated testing directly into your workflows.
Prerequisites
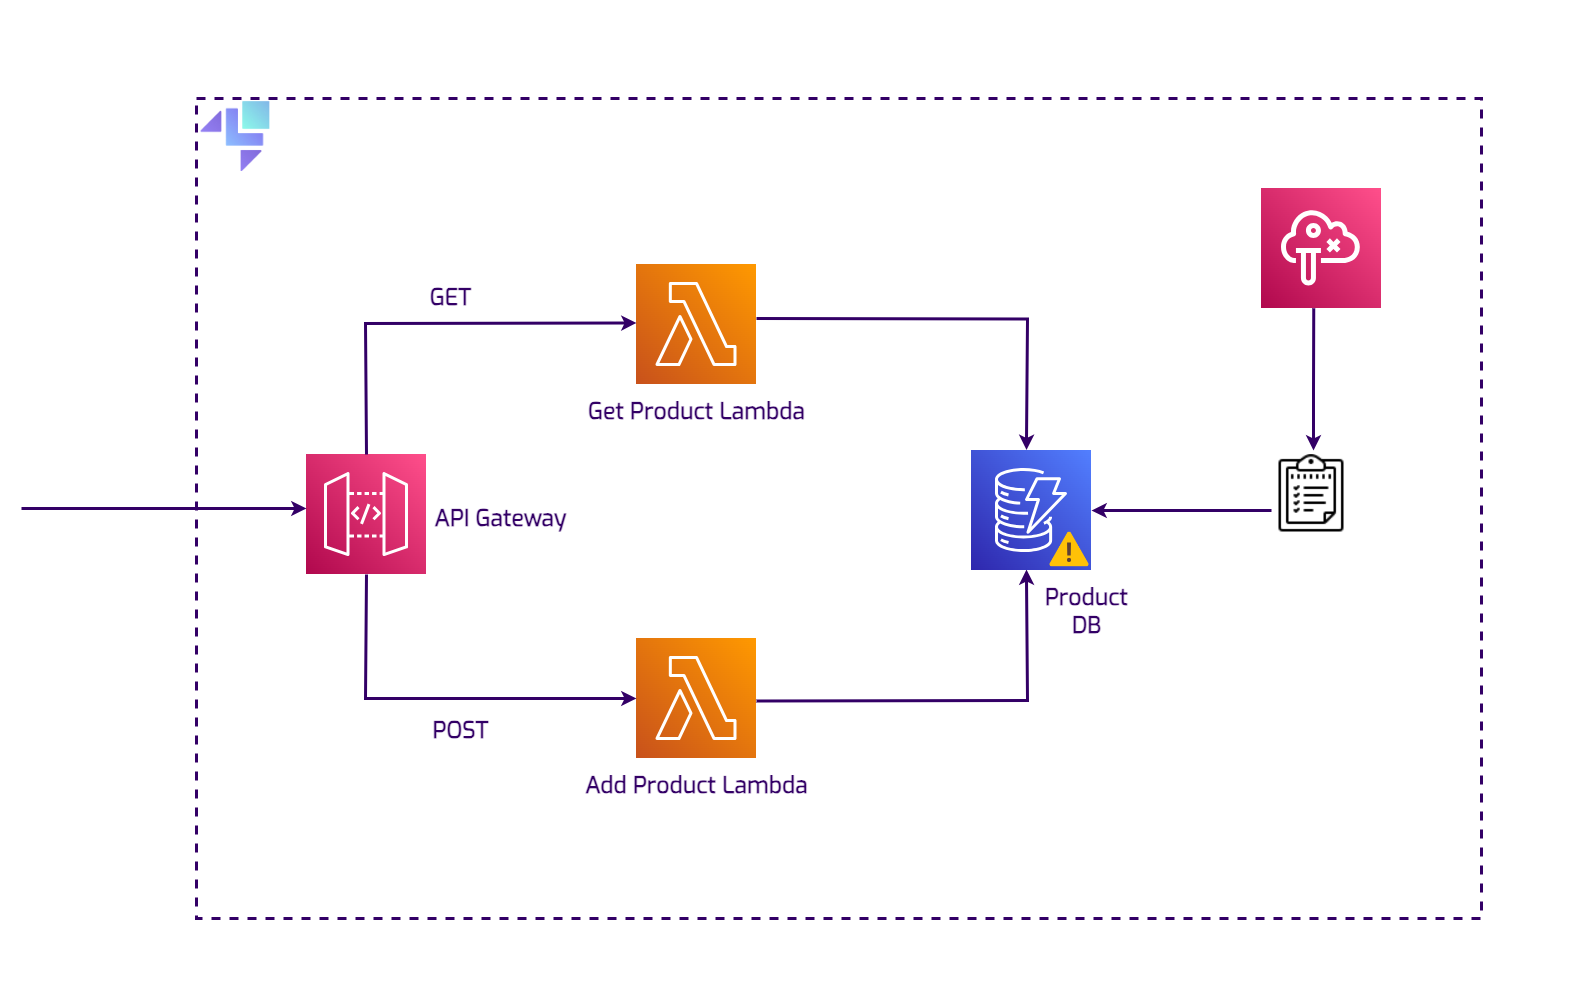
Product Management System with Lambda, API Gateway, and DynamoDB
This demo sets up an HTTP CRUD API functioning as a Product Management System. The components deployed include:
A DynamoDB table named
Products.Three Lambda functions:
add-productfor product addition.get-productfor retrieving a product.process-product-eventsfor event processing and DynamoDB writes.
A locally hosted REST API named
quote-api-gateway.SNS topic named
ProductEventsTopicand SQS queue namedProductEventsQueue.API Gateway resource named
productApiwith additionalGETandPOSTmethods.
Additionally, the applications set up a subscription between the SQS queue and the SNS topic, along with an event source mapping between the SQS queue and the process-product-events Lambda function.
All resources can be deployed using a LocalStack Init Hook via the init-resources.sh script in the repository. To begin, clone the repository on your local machine:
git clone https://github.com/localstack-samples/sample-outages-extension-serverless.git
cd sample-outages-extension-serverless
Let's create a Docker Compose configuration for simulating a local outage in the running Product Management System.
Set Up the Docker Compose
To start LocalStack and install the LocalStack Outages extension, create a new Docker Compose configuration. You can find the official Docker Compose file for starting the LocalStack container in our documentation.
For an extended setup, include the following in your Docker Compose file:
Add the
EXTENSION_AUTO_INSTALL=localstack-extension-outagesenvironment variable to install the Outages extension from PyPI whenever a new container is created.Include the
LOCALSTACK_HOST=localstackenvironment variable to ensure LocalStack services are accessible from other containers.Create the
ls_networknetwork to use LocalStack as its DNS server and enable the resolution of the domain name to the LocalStack container (also specify it viaLAMBDA_DOCKER_NETWORKenvironment variable).Add a new volume attached to the LocalStack container. This volume holds the
init-resources.shfile, which is copied to the LocalStack container and executed when the container is ready.Add another volume to copy the built Lambda functions specified as ZIP files during Lambda function creation.
Optionally, add the
LAMBDA_RUNTIME_ENVIRONMENT_TIMEOUTto wait for the runtime environment to start up, which may vary in speed based on your local machine.
The final Docker Compose configuration is as follows (also provided in the cloned repository):
version: "3.9"

services:
  localstack:
    networks:
      - ls_network
    container_name: localstack
    image: localstack/localstack-pro:latest
    ports:
      - "127.0.0.1:4566:4566"            # LocalStack Gateway
      - "127.0.0.1:4510-4559:4510-4559"  # external services port range
      - "127.0.0.1:443:443"
    environment:
      - DOCKER_HOST=unix:///var/run/docker.sock #unix socket to communicate with the docker daemon
      - LOCALSTACK_HOST=localstack # where services are available from other containers
      - LAMBDA_DOCKER_NETWORK=ls_network
      - LOCALSTACK_AUTH_TOKEN=${LOCALSTACK_AUTH_TOKEN:?}
      - EXTENSION_AUTO_INSTALL=localstack-extension-outages
      - LAMBDA_RUNTIME_ENVIRONMENT_TIMEOUT=600
    volumes:
      - "./volume:/var/lib/localstack"
      - "/var/run/docker.sock:/var/run/docker.sock"
      - "./lambda-functions/target/product-lambda.jar:/etc/localstack/init/ready.d/target/product-lambda.jar"
      - "./init-resources.sh:/etc/localstack/init/ready.d/init-resources.sh"

networks:
  ls_network:
    name: ls_network
Deploy the local AWS infrastructure
Before deploying the demo application locally, build the Lambda functions to ensure they can be copied over during Docker Compose startup. Execute the following command:
cd lambda-functions && mvn clean package shade:shade
The built Lambda function is now available at lambda-functions/target/product-lambda.jar. Start the Docker Compose configuration, which automatically creates the local deployment using AWS CLI and the awslocal script inside the LocalStack container:
export LOCALSTACK_AUTH_TOKEN=<your-auth-token>
docker-compose up
Check the Docker Compose logs to verify that the Outages extension is being installed, along with other local AWS resources:
localstack  | Localstack extensions installer:
localstack  | Localstack extensions installer: Extension installation completed
localstack  |
localstack  | LocalStack version: 3.1.1.dev20240131022456
....

localstack  | Get Product Lambda...
localstack  | 2024-02-26T05:34:18.091  INFO --- [   asgi_gw_1] localstack.request.aws     : AWS lambda.CreateFunction => 201
...
localstack  | 2024-02-26T05:34:23.632  INFO --- [   asgi_gw_1] localstack.request.aws     : AWS sns.CreateTopic => 200
localstack  | {
localstack  |     "TopicArn": "arn:aws:sns:us-east-1:000000000000:ProductEventsTopic"
localstack  | }
localstack  | 2024-02-26T05:34:24.229  INFO --- [   asgi_gw_2] localstack.request.aws     : AWS sqs.CreateQueue => 200
localstack  | {
localstack  |     "QueueUrl": "http://sqs.us-east-1.localstack:4566/000000000000/ProductEventsQueue"
localstack  | }
...
After deployment, use cURL to create a product entity. Execute the following command:
curl --location 'http://12345.execute-api.localhost.localstack.cloud:4566/dev/productApi' \
--header 'Content-Type: application/json' \
--data '{
  "id": "prod-2004",
  "name": "Ultimate Gadget",
  "price": "49.99",
  "description": "The Ultimate Gadget is the perfect tool for tech enthusiasts looking for the next level in gadgetry. Compact, powerful, and loaded with features."
}'
The output should be:
Product added/updated successfully.
You can verify the successful addition by scanning the DynamoDB table:
awslocal dynamodb scan \
    --table-name Products
The output should be:
{
    "Items": [
        {
            "name": {
                "S": "Super Widget"
            },
            "description": {
                "S": "A versatile widget that can be used for a variety of purposes. Durable, reliable, and
 affordable."
            },
            "id": {
                "S": "prod-1002"
            },
            "price": {
                "N": "29.99"
            }
        }
    ],
    "Count": 1,
    "ScannedCount": 1,
    "ConsumedCapacity": null
}
Injecting Chaos in the local infrastructure
You can now use the Outages extension for chaos testing of your locally deployed infrastructure. You can access the Outages extension through the REST API at http://outages.localhost.localstack.cloud:4566/outages, accepting standard HTTP requests.
To create an outage, taking down the DynamoDB table in the us-east-1 region, execute the following command:
curl --location --request POST 'http://outages.localhost.localstack.cloud:4566/outages' \
  --header 'Content-Type: application/json' \
  --data '
  [
    {
      "service": "dynamodb",
      "region": "us-east-1"
    }
  ]'
The output should be:
[{"service": "dynamodb", "region": "us-east-1"}]
This command creates an outage in the locally mocked us-east-1 DynamoDB tables. Verify by scanning the Products table:
awslocal dynamodb scan \
    --table-name Products
The output should be:
An error occurred (ServiceUnavailableException) when calling the Scan operation (reached max retries: 2): Service 'dynamodb' not accessible in 'us-east-1' region due to an outage
You can verify it in the LocalStack logs:
localstack  | 2024-02-26T06:12:02.196  INFO --- [   asgi_gw_1] localstack.request.aws     : AWS dynamodb.DescribeEndpoints => 503 (ServiceUnavailableException)
localstack  | 2024-02-26T06:12:02.200  INFO --- [   asgi_gw_3] localstack.request.aws     : AWS dynamodb.PutItem => 503 (ServiceUnavailableException)
You can retrieve the current outage configuration using the following GET request:
curl --location \
    --request GET 'http://outages.localhost.localstack.cloud:4566/outages'
The output should be:
[{"service": "dynamodb", "region": "us-east-1"}]
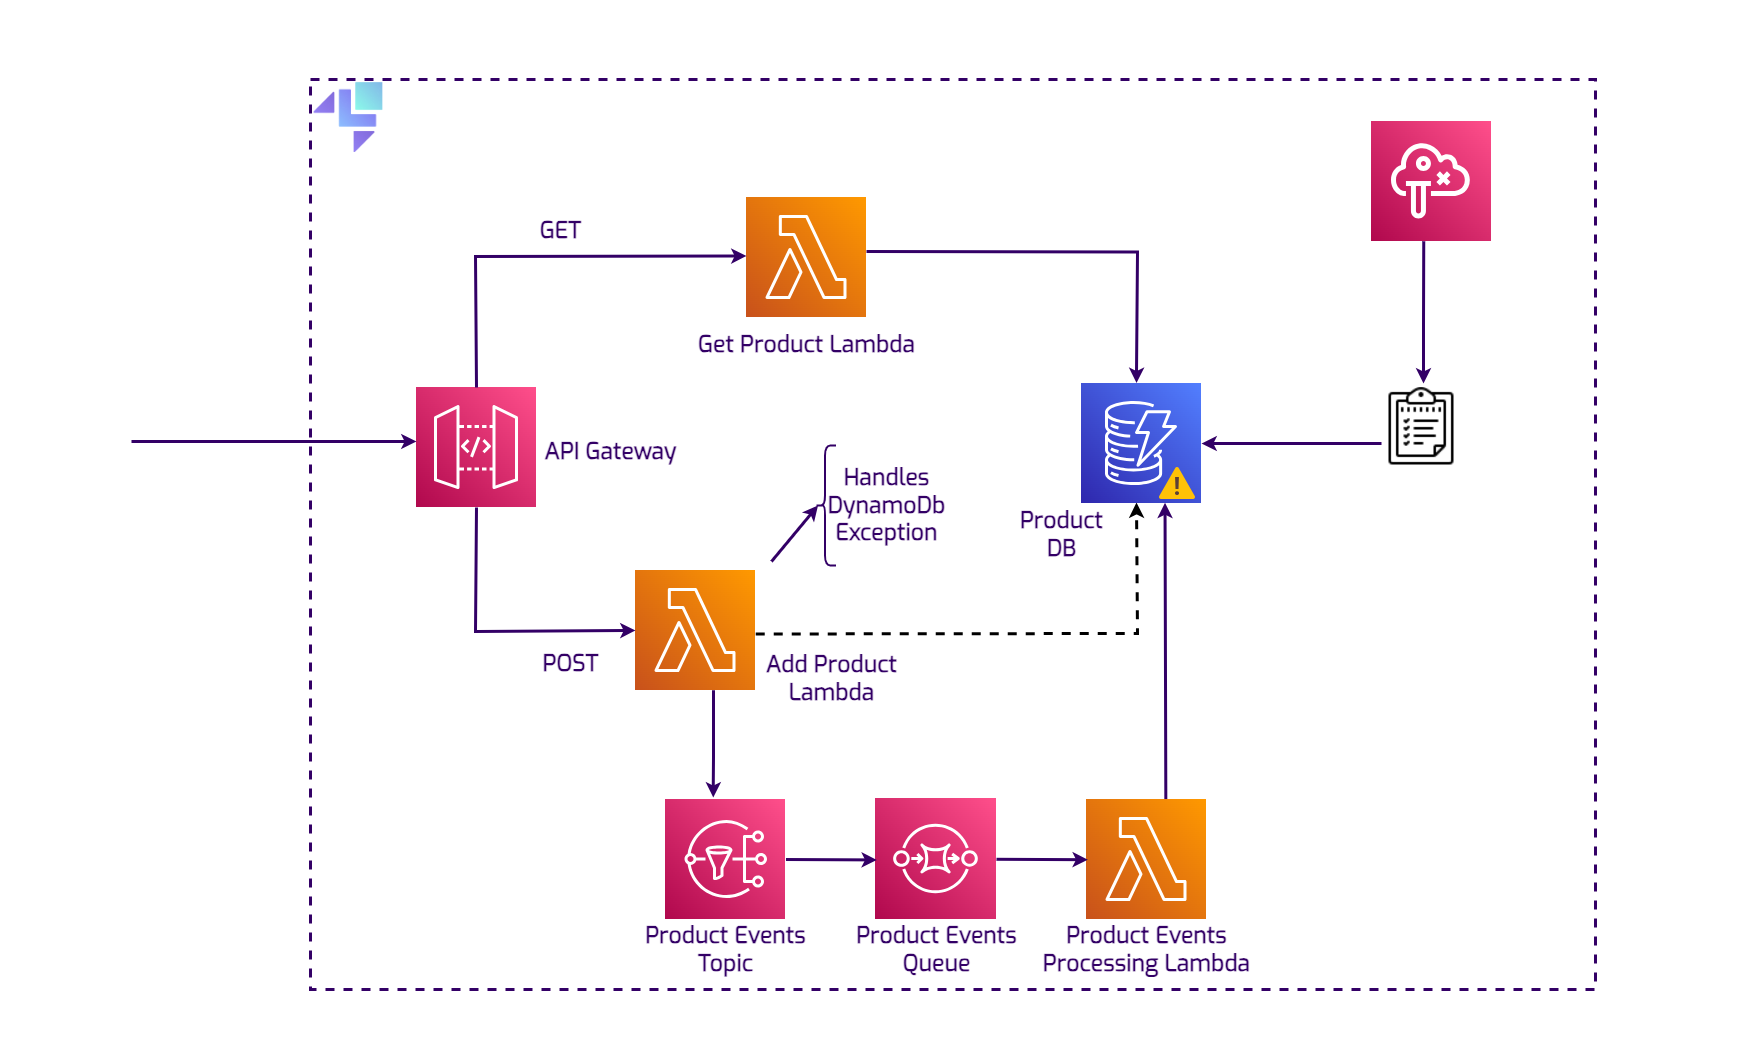
Error handling for the outage
Now that the experiment is started, the DynamoDB table is inaccessible, resulting in the user being unable to get or post any new product. The API Gateway will return an Internal Server Error. To prevent this, include proper error handling and a mechanism to prevent data loss during a database outage.
The solution includes an SNS topic, an SQS queue, and a Lambda function that picks up queued elements and retries the PutItem operation on the DynamoDB table. If DynamoDB is still unavailable, the item will be re-queued.
Test this by executing the following command:
curl --location 'http://12345.execute-api.localhost.localstack.cloud:4566/dev/productApi' \
     --header 'Content-Type: application/json' \
     --data '{
       "id": "prod-1003",
       "name": "Super Widget",
       "price": "29.99",
       "description": "A versatile widget that can be used for a variety of purposes. Durable, reliable, and affordable."
     }'
The output should be:
A DynamoDB error occurred. Message sent to queue.
To stop the outage, send a POST request by using an empty list in the configuration. The following request will clear the current configuration:
curl --location --request POST 'http://outages.localhost.localstack.cloud:4566/outages' \
--header 'Content-Type: application/json' \
--data '[]'
Now, scan the DynamoDB table and verify that the Super Widget item has been inserted:
awslocal dynamodb scan \
    --table-name Products
The output should be:
awslocal dynamodb scan --table-name Products
{
    "Items": [
        {
            "name": {
                "S": "Super Widget"
            },
            ...
            }
        },
        {
            "name": {
                "S": "Ultimate Gadget"
            },
            ...
        }
    "Count": 2,
    "ScannedCount": 2,
    "ConsumedCapacity": null
}
Perform automated chaos testing
You can now implement a straightforward chaos test using pytest to start an outage. The test will:
Validate the availability of Lambda functions and the DynamoDB table.
Start a local outage and verify if DynamoDB API calls throw an error.
Validate the ongoing outage and its appropriate cessation.
Query the DynamoDB table for new items and assert their presence.
For integration testing, you can use the AWS SDK for Python (boto3) and the pytest framework. In a new directory named tests, create a file named test_chaos.py. Add the necessary imports and pytest fixtures:
import pytest
import time
import boto3
import requests

LOCALSTACK_ENDPOINT = "http://localhost:4566"
DYNAMODB_TABLE_NAME = "Products"
LAMBDA_FUNCTIONS = ["add-product", "get-product", "process-product-events"]

@pytest.fixture(scope="module")
def dynamodb_resource():
    return boto3.resource("dynamodb", endpoint_url=LOCALSTACK_ENDPOINT)


@pytest.fixture(scope="module")
def lambda_client():
    return boto3.client("lambda", endpoint_url=LOCALSTACK_ENDPOINT)
Add the following code to perform a simple smoke test ensuring the availability of Lambda functions and the DynamoDB table:
def test_dynamodb_table_exists(dynamodb_resource):
    tables = dynamodb_resource.tables.all()
    table_names = [table.name for table in tables]
    assert DYNAMODB_TABLE_NAME in table_names


def test_lambda_functions_exist(lambda_client):
    functions = lambda_client.list_functions()["Functions"]
    function_names = [func["FunctionName"] for func in functions]
    assert all(func_name in function_names for func_name in LAMBDA_FUNCTIONS)
Now, add the following code to chaos test the locally deployed DynamoDB table:
def test_dynamodb_outage():
    outage_payload = [{"service": "dynamodb", "region": "us-east-1"}]
    requests.post(
        "http://outages.localhost.localstack.cloud:4566/outages", json=outage_payload
    )

    # Make a request to DynamoDB and assert an error
    url = "http://12345.execute-api.localhost.localstack.cloud:4566/dev/productApi"
    headers = {"Content-Type": "application/json"}
    data = {
        "id": "prod-1002",
        "name": "Super Widget",
        "price": "29.99",
        "description": "A versatile widget that can be used for a variety of purposes. Durable, reliable, and affordable.",
    }

    response = requests.post(url, headers=headers, json=data)

    assert "error" in response.text

    # Check if outage is running
    outage_status = requests.get(
        "http://outages.localhost.localstack.cloud:4566/outages"
    ).json()
    assert outage_payload == outage_status

    # Stop the outage
    requests.post("http://outages.localhost.localstack.cloud:4566/outages", json=[])

    # Check if outage is stopped
    outage_status = requests.get(
        "http://outages.localhost.localstack.cloud:4566/outages"
    ).json()
    assert not outage_status

    # Wait for a few seconds
    time.sleep(60)

    # Query if there are items in DynamoDB table
    dynamodb = boto3.resource("dynamodb", endpoint_url=LOCALSTACK_ENDPOINT)
    table = dynamodb.Table(DYNAMODB_TABLE_NAME)
    response = table.scan()
    items = response["Items"]
    print(items)
    assert "Super Widget" in [item["name"] for item in items]
Run the test locally using the following command:
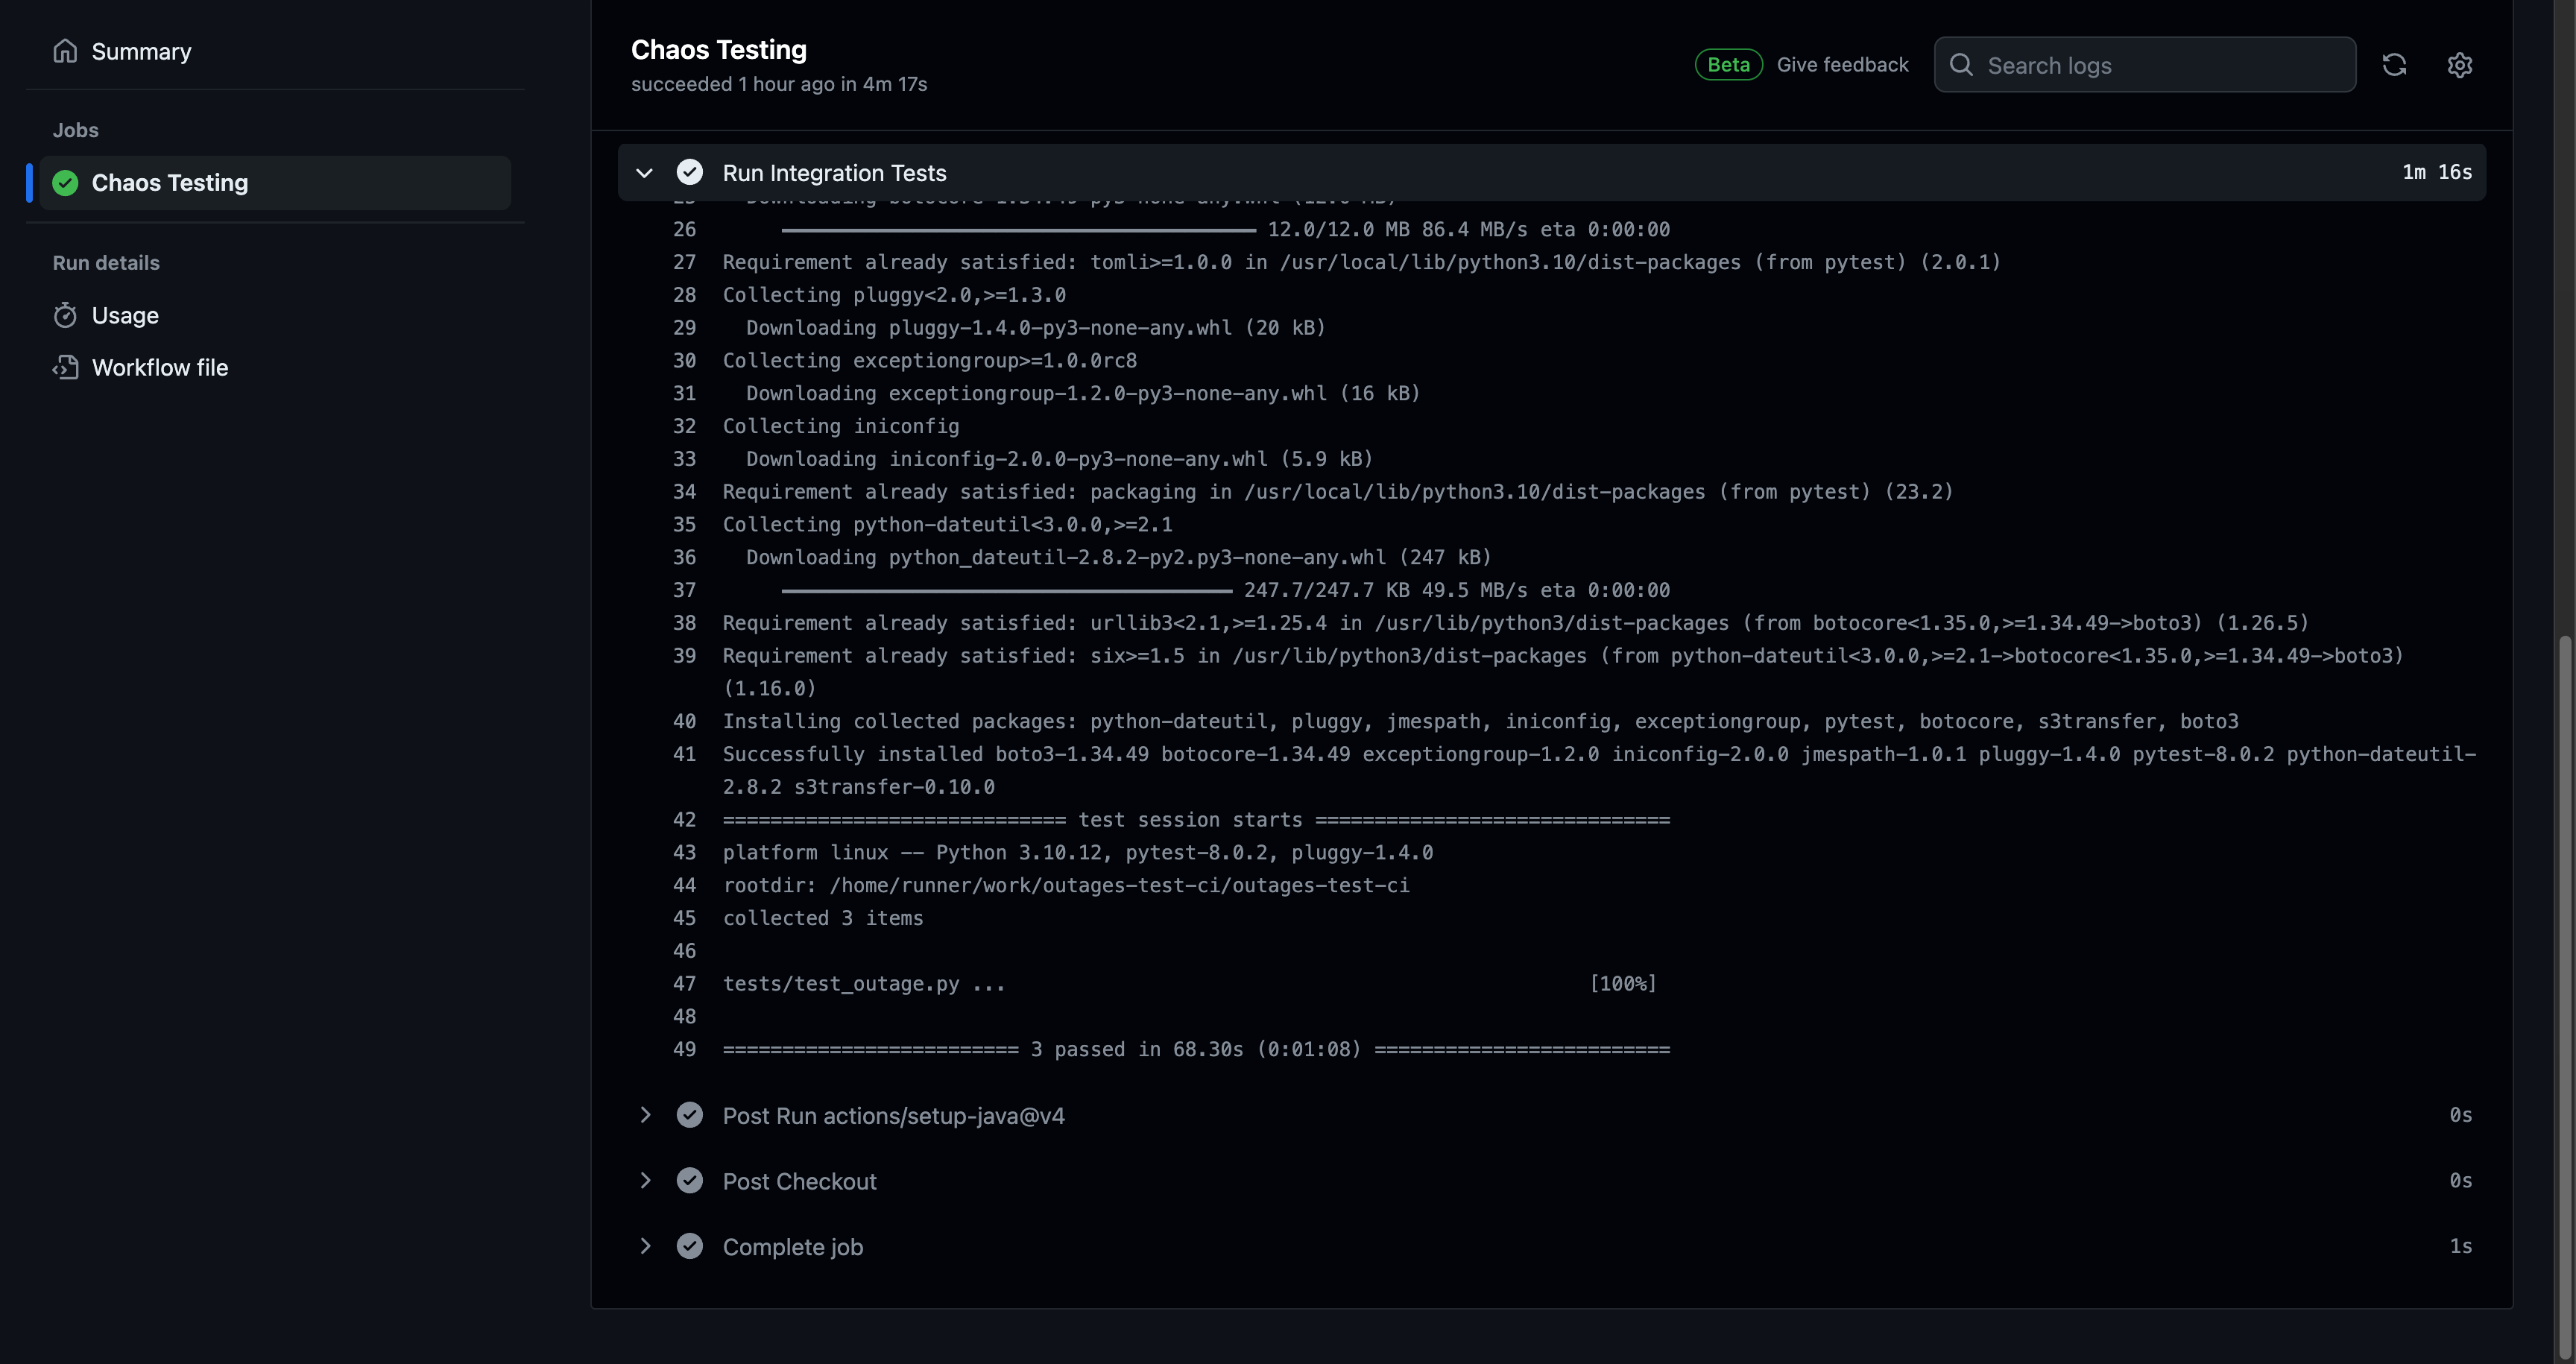
pytest
The output should be:
=========================================== test session starts ============================================
platform darwin -- Python 3.10.4, pytest-7.2.0, pluggy-1.4.0
rootdir: ...
plugins: html-3.2.0, pylint-0.19.0, json-report-1.5.0, Faker-18.4.0, cov-4.0.0, metadata-2.0.4, anyio-3.6.2, datadir-1.4.1
collected 3 items
collected 3 items

tests/test_outage.py ...                                                 [100%]

======================================= 3 passed in 75.86s (0:01:15) =======================================
You now have a successful outage test running on your local machine using LocalStack 🎊
You can further run the tests on a continuous integration (CI) environment, such as GitHub Actions to ensure that you can build & test your infrastructure's resilience with every commit. You can find the sample workflow on the GitHub repository.
Conclusion
Outages extension allows you to further chaos test your other resources, such as Lambda functions, S3 buckets, and more to ascertain service continuity, user experience, and the system’s resilience to the failures introduced, and how far you can go on to fix them. An ideal strategy is to design the experiments and group them in the categories of knowns and unknowns, while analyzing whatever chaos your system might end up encountering.
In the upcoming blog posts, we'll demonstrate how to perform more complex chaos testing scenarios, such as RDS & Route53 failovers, inject latency to every API call, and use AWS Resilience Testing Tools such as Fault Injection Simulator (FIS) locally. Stay tuned for more blogs on how LocalStack is enhancing your cloud development and testing experience.
You can find the code in this GitHub repository.